To create a new Email Template navigate to the 'Email design templates' page. This page can be found in thesub- menu of Customer Notifications in the left side bar menu on the Touchpoints Page.

It will navigate to a list of previously created templates. Naturally, this list will be empty if no templates were created previously. Do so by clicking the Create new button in the upper right corner of the window.

Set up
To start the creation process via the HTML editor set up the following parameters:
1. Choose localisation
First, decide on the localisation for the template. The localisation is the combination of a shop url with the correct domain and the corresponding language. More information on localisations can be found here.
2. Name email design template
Find a fitting name that describes the use case of the template for example 'Order delayed'.
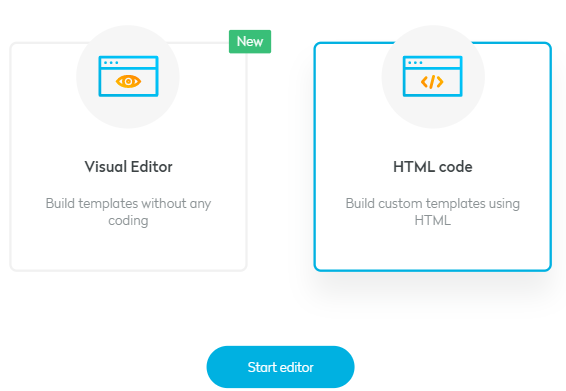
3. Choose a starting point
Now choose to configure the template via our Visual Editor or using the HTML editor. In this case, choose the HTML-Editor and click the Code your own in order to proceed.
Designing a template
The page is divided into two sections. The HTML code on the left and a preview of the template on the right. Write the HTML code directly into the dark pane on the left and see a preview of what is being written in real-time. Switch between mobile and desktop view by choosing one of the two icons above the preview pane.

It is also possible to put the editor into fullscreen mode by clicking the arrow icon above the HTML code area.

HTML Tips
1. Dynamic placeholders
While editing HTML code in the editor, Seven Senders Portal variables can be included. When the email notification is sent, those variables will be replaced by the shipment/order corresponding information. Use specific variables depending on the kind of event that triggers the notification. The following is a list of event types and the corresponding variables and their description:
Event | Placeholder | Description |
Order Event & Shipment Event | {{CustomerFirstName}} | The "customer first name" in outbound shipment case. In return shipment case, it should be "sender's first name". |
Order Event & Shipment Event | {{CustomerLastName}} | The "customer last name" in outbound shipment case. In return shipment case, it should be "sender's last name". |
Order Event & Shipment Event | {{CustomerAddress}} | The "customer delivery address" in outbound shipment case. In return shipment case, it should be "sender's address". |
Order Event & Shipment Event | {{CustomerAddressCompany}} | The customer company for the delivery address |
Order Event & Shipment Event | {{CustomerAddressZIPCode}} | The "customer delivery address ZIP code" in the outbound shipment case. In return shipment case, it should be "sender's ZIP code". |
Order Event & Shipment Event | {{CustomerAddressCity}} | The "customer delivery address city" in outbound shipment case. In return case, it should be "sender's city". |
Order Event & Shipment Event | {{CustomerAddressCountry}} | The "customer delivery address country" in outbound shipment case. In return shipment case, it should be "sender's country". |
Order Event & Shipment Event | {{CustomerAddressCountryISOCode}} | The "code ISO 2 for the customer delivery address country" in outbound shipment case. In return shipment case, it should be "sender's CountryISOCode". |
Order Event & Shipment Event | {{CustomerEmailAddress}} | The "customer email address" in outbound shipment case. In return shipment case, it should be "sender's email". |
Order Event | {{TrackingPageUrl}} | The Seven Senders Tracking Page URL for this order |
Order Event | {{ShopOrderId}} | The order reference inside your system |
Order Event | {{OrderCreationDate}} | The order creation date |
Shipment Event | {{TrackingCode}} | The tracking number for this shipment |
Shipment Event | {{RealCarrierName}} | The carrier in charge of this shipment |
Shipment Event | {{ReferenceNumber}} | The shipment reference inside your system |
| Current Year | {{CurrentYear}} | Will display the current year it is |
2. A useful tip
Make sure to replace every ''&'' character with ''&'' to be compliant with the HTML format.
&