To create a new Email Template navigate to the 'Email design templates' page. This page can be found in the sub-menu of customer notifications in the left side bar menu of the Touchpoints page.

It will navigate to a list of previously created templates. Naturally, this list will be empty if no templates were created previously. Do so by clicking the Create new button in the upper right corner of the window.

Set up
To start the creation process set up the following parameters:
1.Choose localisation
First, decide on the localisation for the template. The localisation is the combination of a shop url with the correct domain and the corresponding language. More information on localisations can be found here.
2. Name email design template
Find a fitting name that describes the use case of the template for example 'Order delayed'.
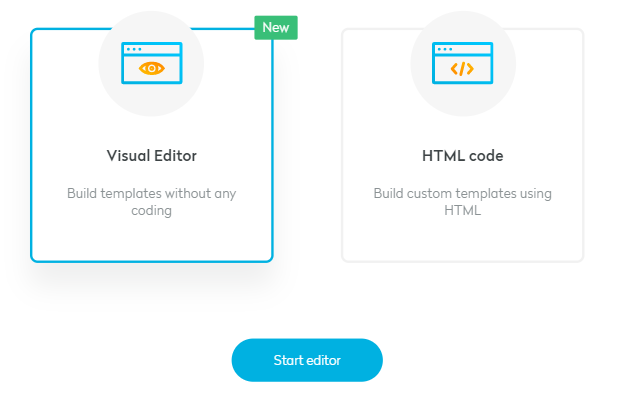
3. Choose a starting point
Now choose to configure the template via our Visual Editor or using the HTML editor. In case of the ‘Visual Editor’, click Start editor button to proceed.
Designing a Template
The page is divided into two sections. The editor on the left and a preview of the template on the right. Properties that are changed in the editor will cause the preview to change accordingly. Switch between mobile and desktop view by choosing one of the two icons above the preview pane.

The editor contains two subcategories 'Widgets' and 'Page design' - the first one to define the general sections of the email notification and the latter to change visual and stylistic aspects of the email.
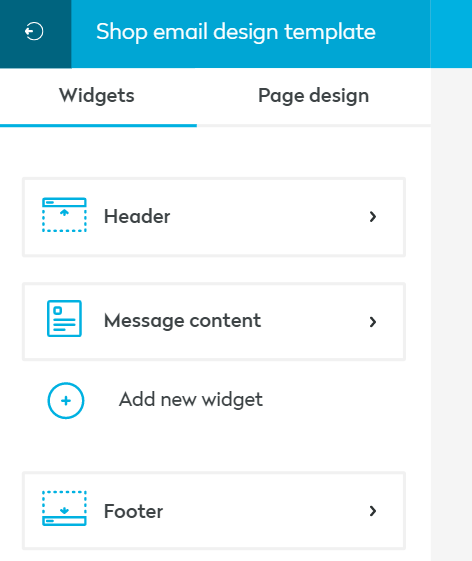
1. Widgets
The widgets tab lists the components of the email layout from top to bottom. Edit each one by clicking the corresponding button in the editor and the fields within.
HEADER
The header is the section on top of the notification. It features a logo and up to four distinct links that can be set up.
MESSAGE CONTENT
This is the main section of the notification. It displays a bar containing an icon, the event message and it’s description.
The main content of the notification should show the event, a corresponding icon and a description.
In order to personalize the notification Seven Senders Portal variables can be included. When the email notification is sent, those variables will be replaced by the shipment/order corresponding information.

Helpful Tip: Dynamic Place HoldersEvent
Placeholder
Description
Order Event & Shipment Event
{{CustomerFirstName}}
The "customer first name" in outbound shipment case. In return shipment case, it should be "sender's first name".
Order Event & Shipment Event
{{CustomerLastName}}
The "customer last name" in outbound shipment case. In return shipment case, it should be "sender's last name".
Order Event & Shipment Event
{{CustomerAddress}}
The "customer delivery address" in outbound shipment case. In return shipment case, it should be "sender's address".
Order Event & Shipment Event
{{CustomerAddressCompany}}
The customer company for the delivery address
Order Event & Shipment Event
{{CustomerAddressZIPCode}}
The "customer delivery address ZIP code" in outbound shipment case. In return shipment case, it should be "sender's ZIP code".
Order Event & Shipment Event
{{CustomerAddressCity}}
The "customer delivery address city" in outbound shipment case. In return case, it should be "sender's city".
Order Event & Shipment Event
{{CustomerAddressCountry}}
The "customer delivery address country" in outbound shipment case. In return shipment case, it should be "sender's country".
Order Event & Shipment Event
{{CustomerAddressCountryISOCode}}
The "code ISO 2 for the customer delivery address country" in outbound shipment case. In return shipment case, it should be "sender's CountryISOCode".
Order Event & Shipment Event
{{CustomerEmailAddress}}
The" customer email address" in outbound shipment case. In return shipment case, it should be "sender's email".
Order Event
{{TrackingPageUrl}}
The Seven Senders Tracking Page URL for this order
Order Event
{{ShopOrderId}}
The order reference inside your system Order Event
{{OrderCreationDate}}
The order creation date
Shipment Event
{{TrackingCode}}
The tracking number for this shipment
Shipment Event
{{RealCarrierName}}
The carrier in charge of this shipment
Shipment Event
{{ReferenceNumber}}
The shipment reference inside your system
Current Year {{CurrentYear}} Will display the current year it is ADD A NEW WIDGET
By default the template only includes a 'message content' widget but further can be added through the add new widget button. The following widgets are available:

MESSAGE CONTENT
The main content of the notification should show the event, a corresponding icon and a description.
In order to personalize the notification Seven Senders Portal variables can be included. When the email notification is sent, those variables will be replaced by the shipment/order corresponding information.
SHIPMENT ETA
Shows the 'Expected time of Arrival' (ETA) of a shipment. It is calculated as following:
First Hub Scan Date + Service Level Agreement (SLA) Days (configured at the shop settings)
Hence, a Shipment ETA can only be calculated and displayed within an email template if a First Hub Scan occurred and an SLA was added within the settings section. Please note, that’s why it’s recommended to send out email templates containing a Shipment ETA Widget for Sending Logics with a First Hub Scan event as trigger. The entire widget will be hidden from the email notification in case no Shipment ETA can be calculated.
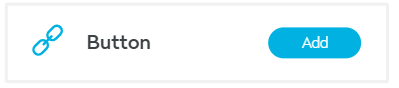
BUTTON
Provides a link to any given web address.
Hint: to embed your Tracking Page into your notifications using the button widget use your Tracking Page link and replace the placeholder <orderId> by {{ShopOrderId}}CONTACT SHOP
Displays the company’s phone number and email address for contact.
CONTACT Carrier
Displays the carrier’s contact details. Please note that only the logo, carrier name and tracking number will be automatically filled in from the shipment information. Make sure to manually complete the remaining fields (title, phone number and email address).FOOTER
Lastly, in the footer section choose whether to display copyright information as well as a promotion for Seven Senders Portal.
The widgets can be reordered by holding the sort icon next to any widget and dragging it to the preferred position. Please note, the header as well as footer are fixed. Hence, they can’t be reordered.
2. Page design
The page design tab includes all the stylistic options that can be edited to personalise a notification.

- TYPOGRAPHY
This section determines the font and size for each section in a notification. Besides the most common fonts, Seven Senders Portal also support Google fonts.
Important: Google fonts aren't supported by all email clients. The following email clients do support this typ of font:
- Apple Mail
- Apple iPhone
- Apple iPad
- Outlook for Mac
- Samsung Mail
Note, Seven Senders Portal is using fallback fonts in case a certain font is not supported by the email client.
2. COLOURS
Every section can also be edited to have a distinct color scheme. Every item in each section can be colored separately.
3. STYLING
Choose between multiple styles for the 'status icon' and 'widget icons'.
A fully customized notification completely set up in the visual editor can display a company’s corporate identity and convey a more personal and professional customer experience.
After editing the template it can be saved and/ or sent as a test email via the Send Test button in the top-right corner of the page. The saved template can now be used to create Sending logics in order to automatically send out the right email notification for a certain event. Please refer to our Setting up Sending Logics page for further information.